Sick of still having to teach players the first boss and I personally like a written guide rather than just a PoV video which doesn't explain what is happening.
So here's a quick written How To Guide on killing 1st bosses in Prometun H There are multiple ways of doing it, but this is probably the easiest and avoids players getting pulled. I haven't included what the Main Tank needs to do.
There are phases in which the boss gets stronger and the damage dealt is higher, plus determines how many people need to stack, and how many losing rationalities are cast.
Group makeup: 1 Main Tank, 1 Cleric, 4 DPS (1 of which should be able to talk on voice chat)
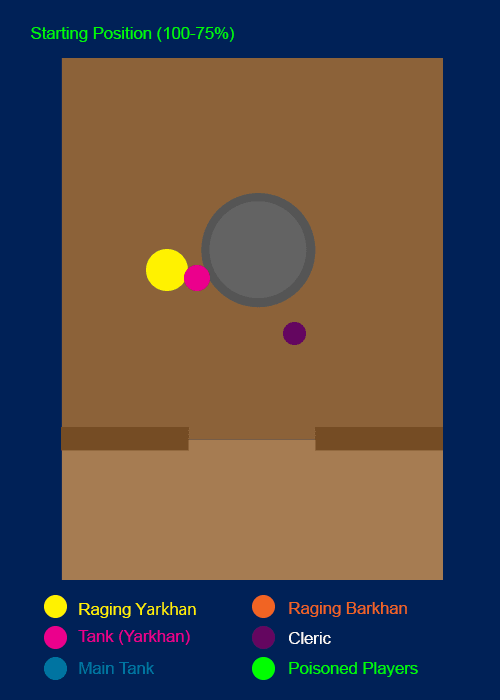
1) Yarkhan - Starting Position
Select a person to tank Raging Yarkhan - As long as they have good damage and can self-heal or not need as much. (most classes can do this).
Stand in the position indicated in the image, you are stood next to the chain in the room, on the opposite side to where Yarkhan will spawn (but slightly off centre to make it easier). You should never need to move from this position throughout the entire fight. You are also responsible for calling Poison Tail out on your team.
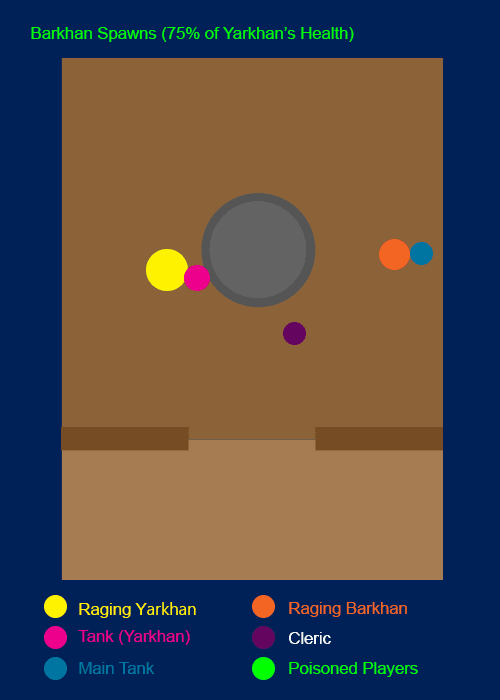
2. Barkhan
Your Main Tank (Indicated in Blue), will wait near the wall until Yarkhan has reached 75% Health left. (Barkhan will then spawn). The Cleric (Indicated Burgundy) can position themselves in the spot indicated to ensure they can reach the main tank and player tanking Yarkhan if needed.
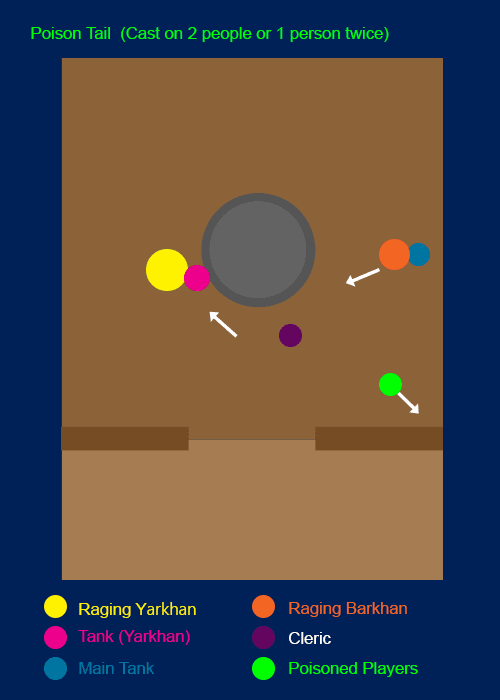
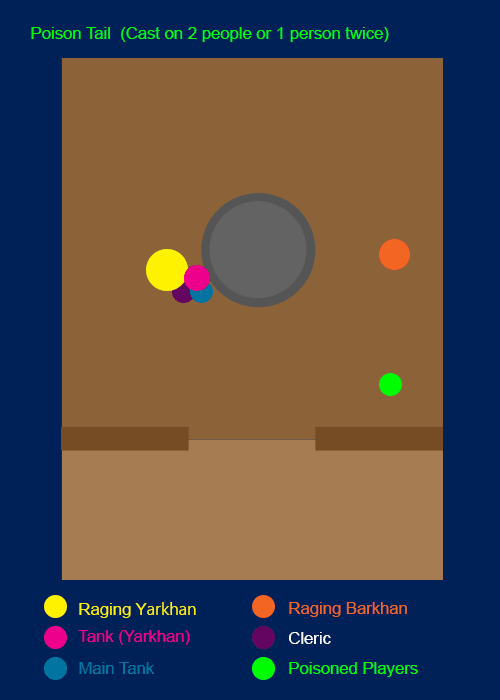
3. Poison Tail
During the fight, Yarkhan will cast Poison Tail x2, it can be on 2 players or 1 player twice. The Person tanking Yarkhan will call this out (Easier over TS/Discord).
The people who are poisoned can move to the corner (indicated Green Spot).
*Poisoned players can continue to damage Barkhan.
Anyone who IS NOT poisoned must move to where Yarkhan is being tanked and STACK together.
4. Poison Tail - Stacking + Pull
Those who are not poisoned must stack, the reason for stacking is Yarkhan will cast a skill where the damage is shared out. The longer you take to kill them, the more people that is required to stack. (This skill is also 15m range, so if you in the area when poisoned or not stacking you will take the full range of damage). All players stacking can use their skills on Yarkhan to damage him faster (your highest DPS'ers will be assigned to Barkhan, but should help when stacking)
Immediately after the skill is cast, Barkhan will use a skill to pull all the players towards him. If you are stacking in the posiiton indicated, you will not be pulled (you can also use a resist skill).
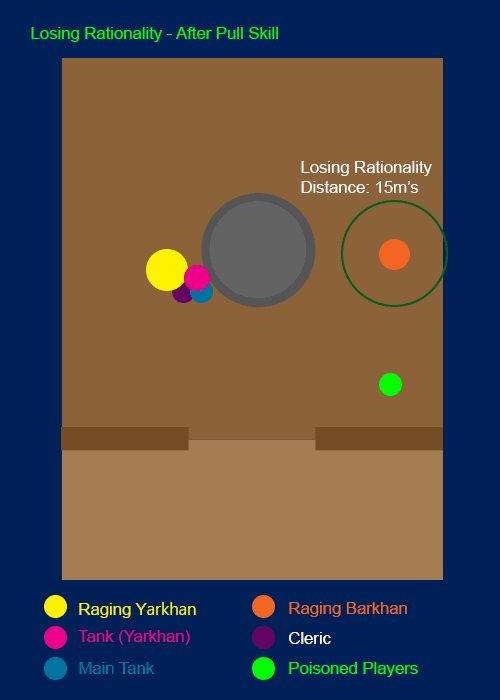
5. Losing Rationality
Losing Rationality is cast after he has pulled everyone towards him. (if you are stacking where indicated and not pulled, you should damage yarkhan until it is safe to return to Barkhan). The Cleric should dispel everyone who is pulled though as they will have recieved a debuff slowing their running. You need to avoid the Losing Rationality skill (it is 15m's) just stand outside
6. Return to positions
Once 'Losing Rationality' has been cast (each phase has 1 or 2 casts in a row) you can return to damaging Barkhan. Both bosses need to die together (you have approx 30 seconds to kill the 2nd, once the first dies)
Phase 1
1 person needs to stack (noone needs to move) - 1 Losing Rationality
Phase 2
2 People need to stack - 2 Losing Rationality
Phase 3
At least 3 people need to stack (Ideally everyone who isn't poisoned) - 1 Losing Rationality
Phase 4
Everyone (except poisoned) to stack - 2 Losing Rationality.
Phase 5
Bosses should be dead before this (your team lacks damage output), but Losing Rationality is likely to be cast directly on a player and anyone who is in 15m range will die.
If at any point someone dies, they will have to rez at the start of the instance and run back....(Yasba + 60% running transform helps)